
Install a .zip file with Recovery
Android 16 Lineout. These steps and photos were taken on Bass: Lineout (Lineage 23.2 / Android 16).
Sometimes you get a .zip file: an update, a fix, or an add-on (Google apps, for example). You can't open it like a photo or a document. It has to be installed from Recovery, a small repair menu that starts instead of Android.
It takes about 5 minutes. Installing a .zip this way does not erase your apps or files (unless the instructions that came with the file say so).
Go slowly and do one step at a time. Every step has a photo of what the screen should look like, so you can check you're in the right place before you press anything.
Before you start
You need:
-
The .zip file (for example
MindTheGapps-16.0.0-x86_64.zip). Write its name down: you'll look for it later. -
A keyboard. A USB keyboard, or the one built into your laptop. A Bluetooth keyboard will not work here.
-
Power. Plug in the charger if your device has a battery.
Put the .zip file in one of these two places:
-
On the device itself (easiest). Download it with the web browser on the device. It goes into the Download folder.
-
On a USB stick. Copy it onto a USB stick with another computer, then plug the stick into the device before you start.
The only keys you need
Nothing happens until you press Enter. If you highlight the wrong line, just move again.
Don't worry about the "ERROR:" lines. In Recovery, the bottom of the screen is always full of white lines starting with ERROR:. That's normal, even when everything works. Ignore them. The only lines that matter are the ones this guide tells you to look for.
Step 1: Open the start menu
-
Restart the device the normal way (hold the power button, then Restart).
-
Watch the screen. Before Android starts, a light blue screen with a short list appears. This is the start menu.
-
As soon as you see it, press Down arrow once, so it doesn't start Android on its own.
-
Move the highlight to Recovery modes for BlissOS and press Enter.
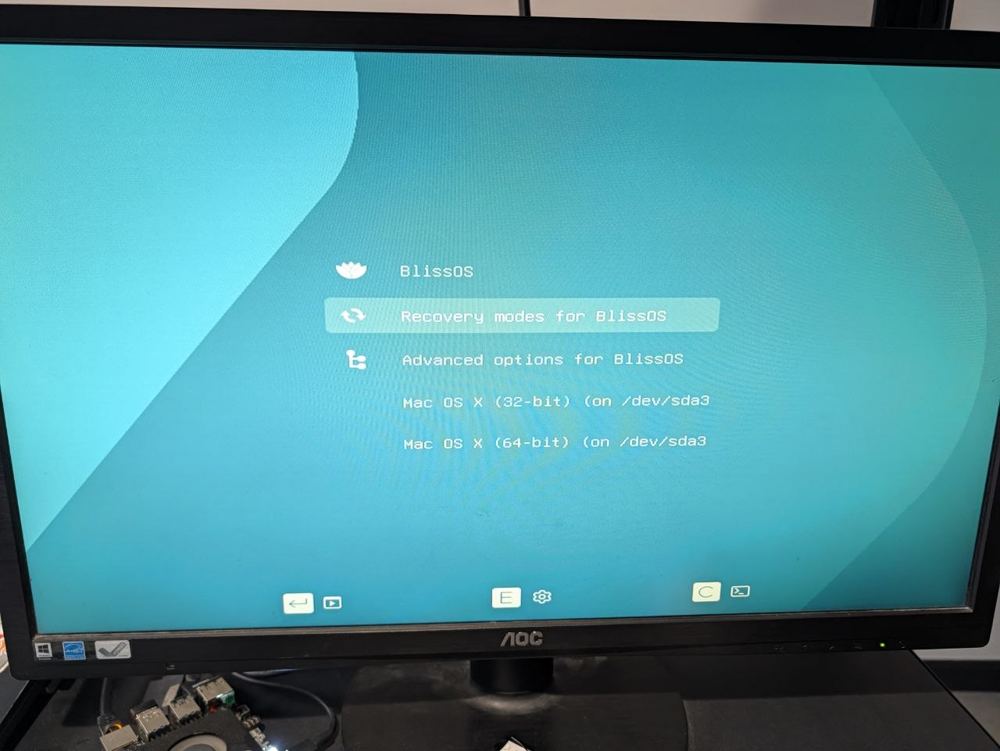
Your list may have other lines too (like the two "Mac OS X" lines in this photo). That's fine.
Android started instead? You missed the menu. That's very common. Restart again, and this time start tapping the Down arrow key as soon as the screen goes dark.
Step 2: Choose "Recovery Mode"
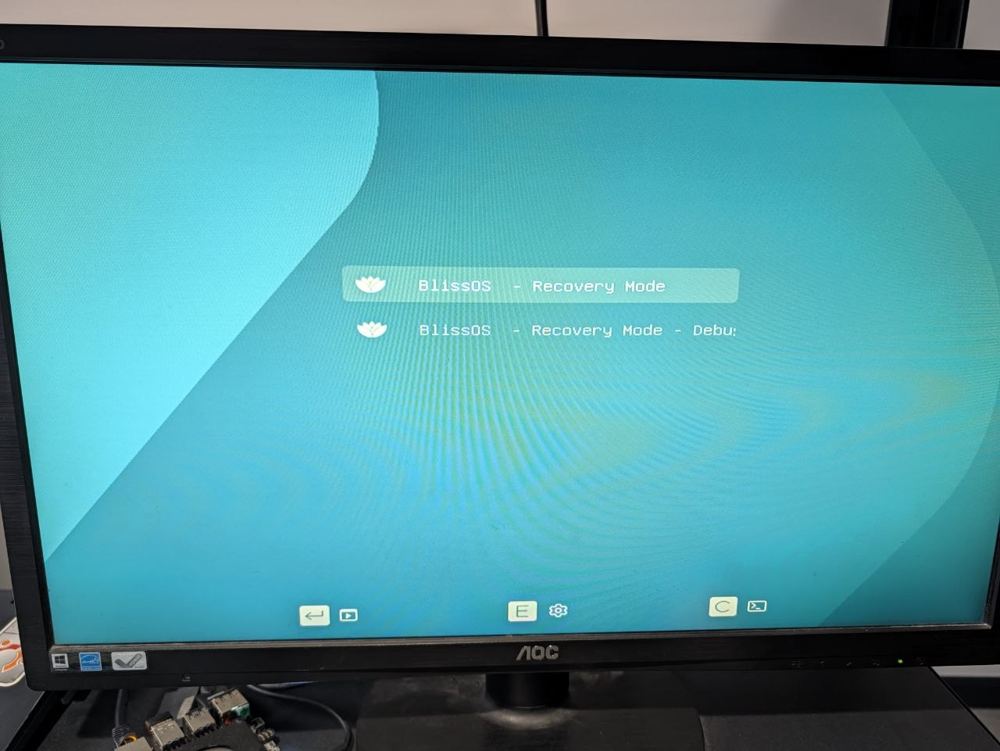
A second, shorter list opens. Keep the highlight on the first line, BlissOS - Recovery Mode, and press Enter. (Not the one that ends in "Debug".)
Step 3: Choose "Apply update"
After a few seconds, the dark Recovery screen opens, with the Recovery logo at the top. Move the highlight to Apply update and press Enter.
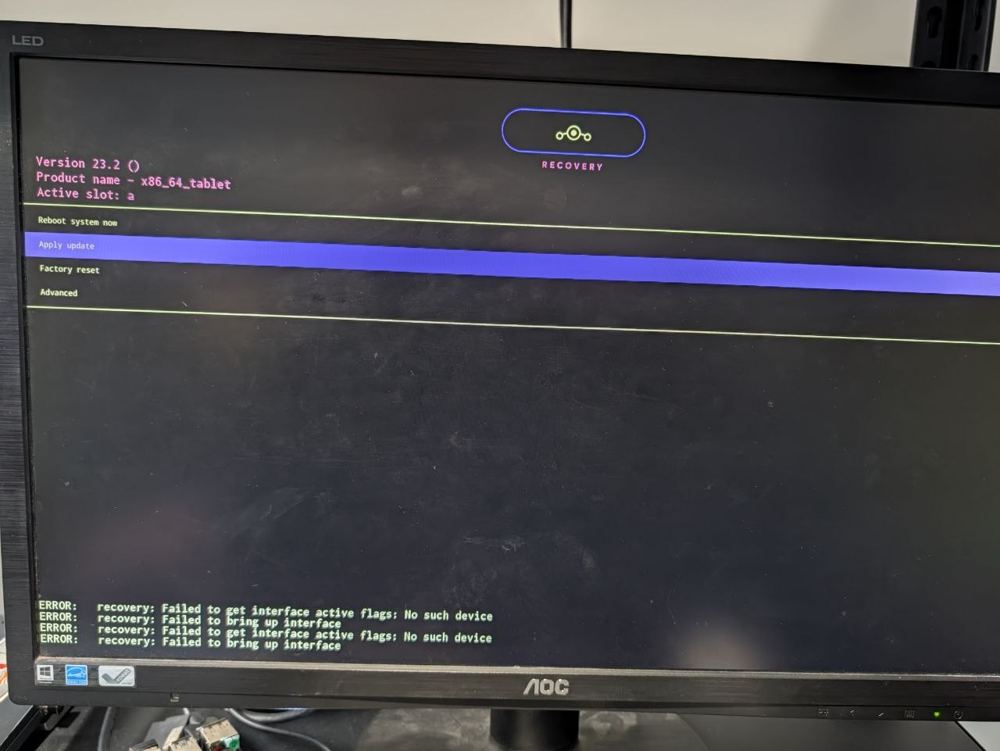
Stay away from "Factory reset". It erases everything on the device. You never need it to install a .zip.
Step 4: Choose where the file is
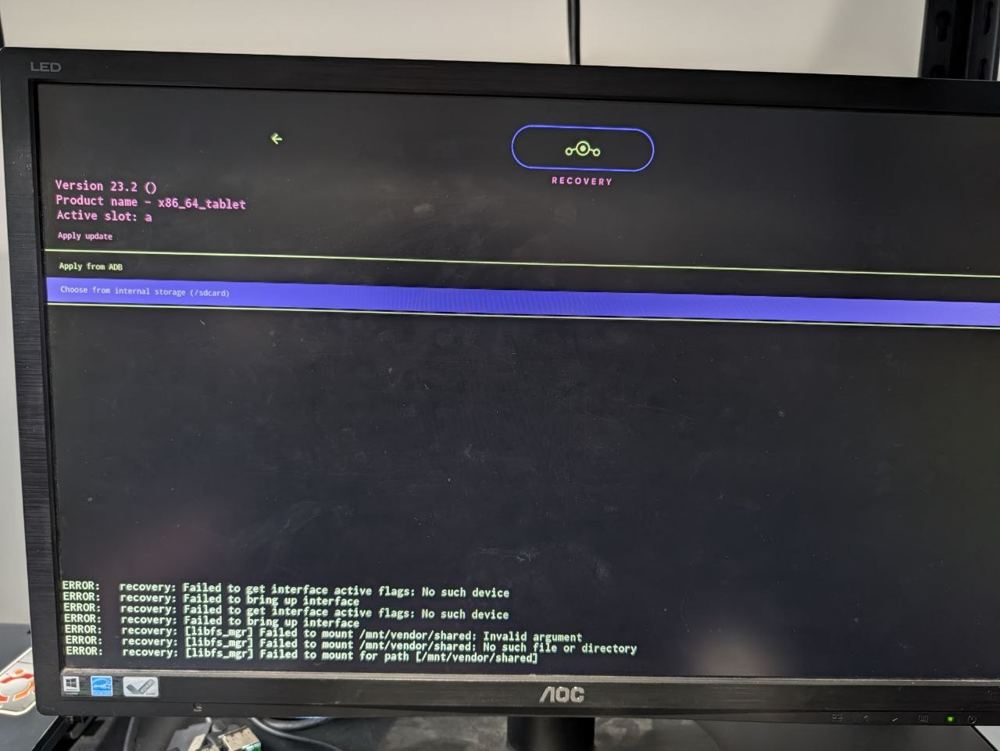
The next screen asks where your .zip file is:
-
If you downloaded the file on the device, choose Choose from internal storage (/sdcard).
-
If the file is on a USB stick, choose Choose from usb.
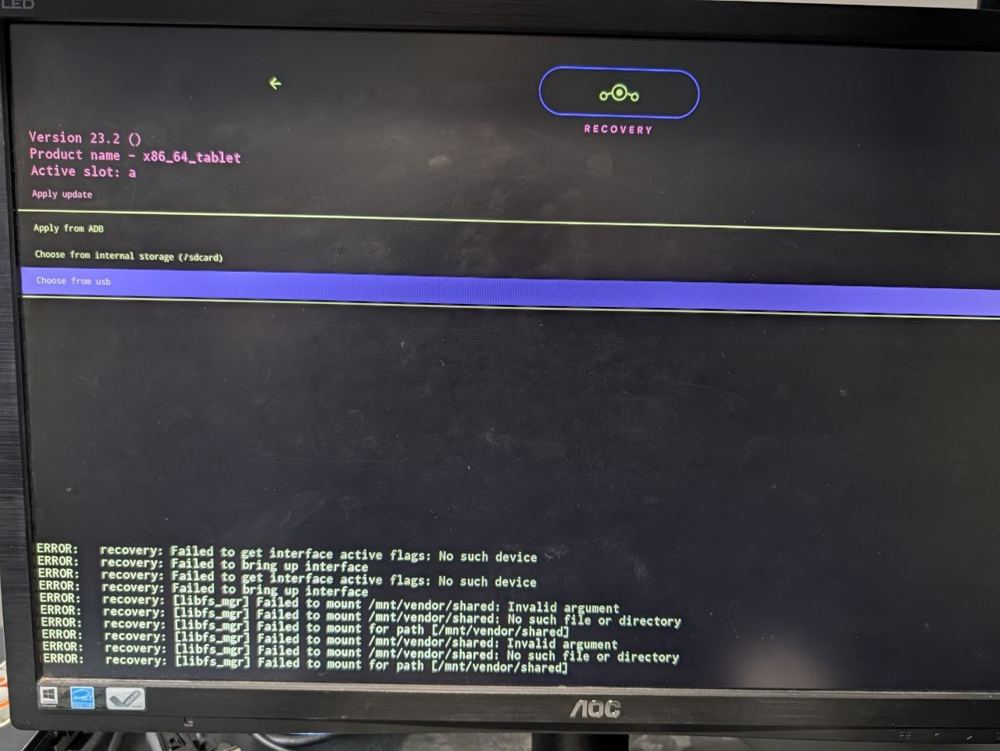
Don't choose Apply from ADB. That one is for developers.
No "internal storage" line, or no "usb" line? Some devices don't show internal storage here: put the .zip on a USB stick instead. If "Choose from usb" isn't there, unplug the stick, plug it back in, press Backspace, and choose Apply update again.
Step 5: Open the folder your file is in
Now you see a list of folders. The line at the top under Choose a package to install: tells you which folder you're in.
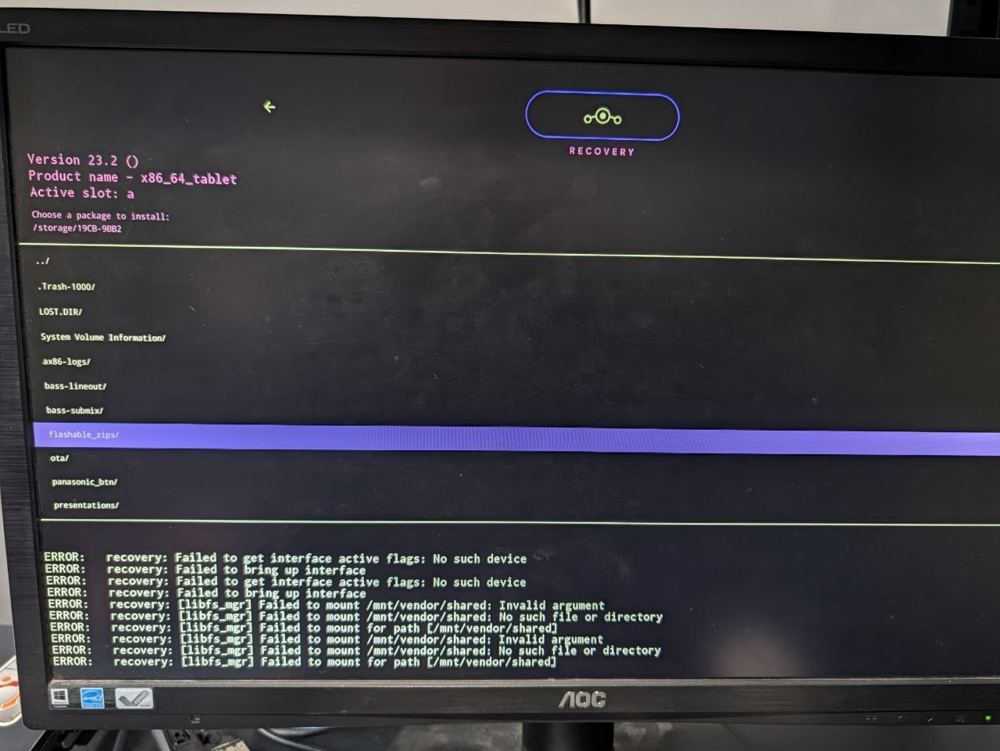
How to read this list:
- A name that ends with
/is a folder. Highlight it and press Enter to open it. ../at the very top means go back to the folder before.- Only .zip files and folders are shown.
Open the folder your file is in. For files you downloaded on the device, that's Download/.
Step 6: Choose your file
Inside the right folder, your .zip file is listed (files come before folders). Highlight your file, the name you wrote down, and press Enter.
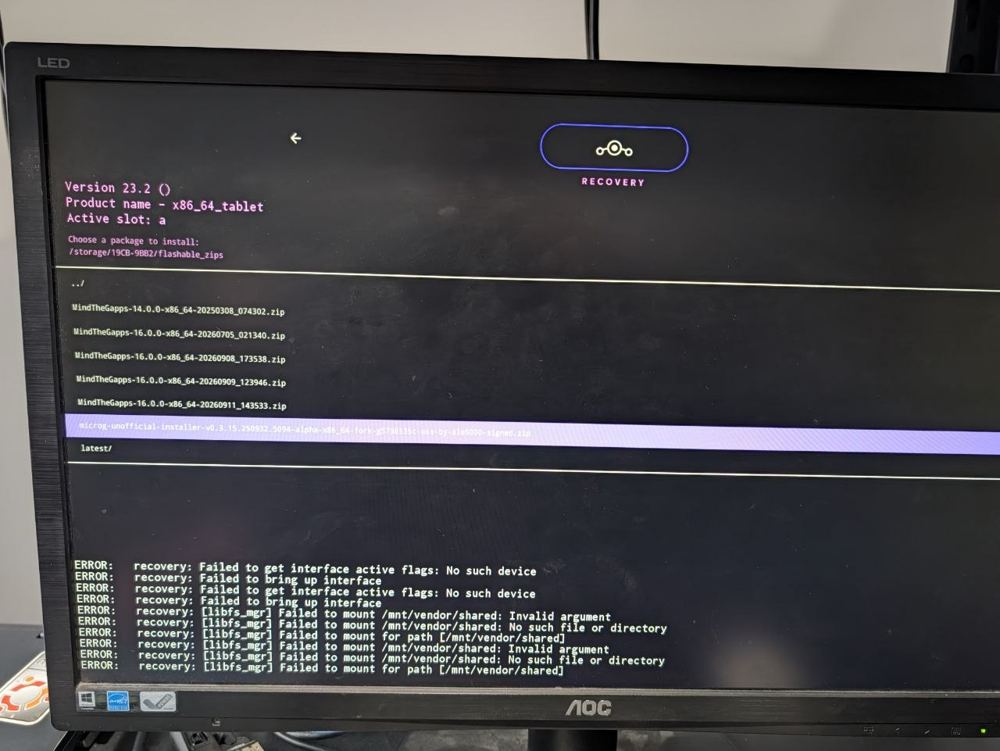
The names can be long and look alike. Check the end of the name carefully before you press Enter.
Step 7: Answer "Yes"
Recovery may now ask:
Signature verification failed Install anyway?
This is normal for add-ons and fixes. It only means the file doesn't carry the special signature Recovery looks for. (Some update files do carry it: then you won't see this question, and the install just starts.)
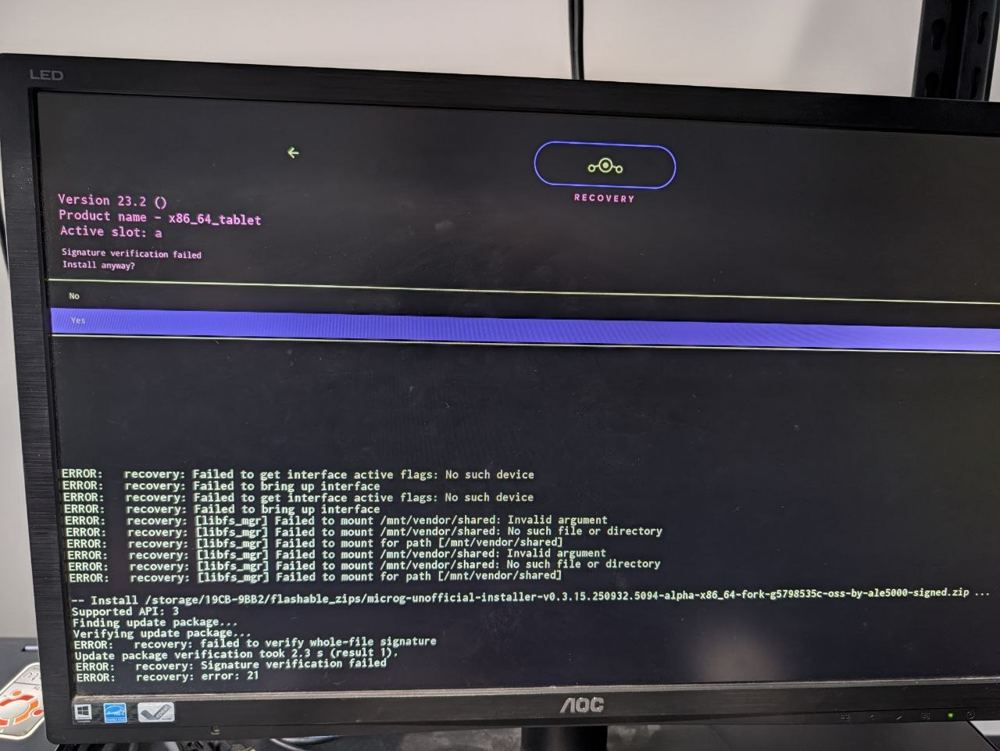
The highlight starts on "No". Press Down arrow once so Yes is highlighted (like in the photo), then press Enter. If you press Enter right away, you've chosen No and nothing is installed: just go back to Step 3.
Only answer Yes for files you got from us or from someone you trust.
Step 8: Wait for "status 0"
Lines of text appear while the file installs. Don't turn the device off. This usually takes a minute or two.
It's finished when the menu from Step 3 comes back. Look in the text for these two things:
- Done!
- Install completed with status 0.
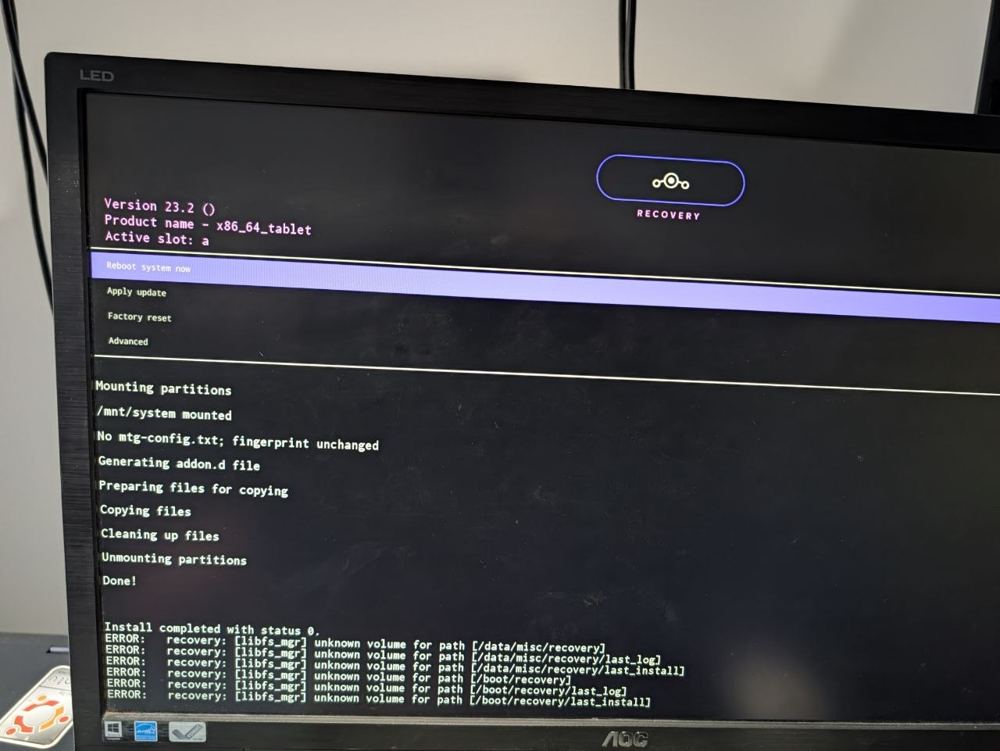
Status 0 means it worked. (Remember: ignore the ERROR: lines under it.)
Step 9: Restart into Android
The highlight is already on Reboot system now (the first line). Press Enter.
Android starts again. The first start after an install can take a little longer than usual. That's normal.
You're done.
If something goes wrong
If the text says Install completed with status 1 (or any number that isn't 0) and Installation aborted., the file didn't install:
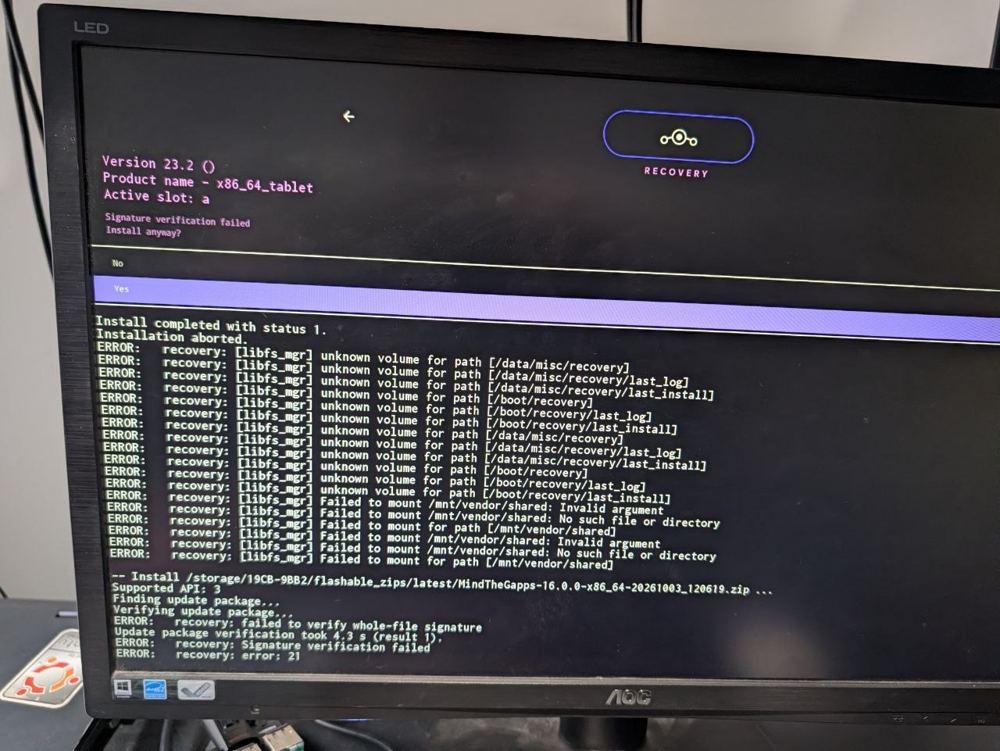
Usually nothing was changed. The file may not be meant for this device or this Android version, or the download may be broken. Choose Reboot system now, download the file again, and try once more. If it fails again, ask us for help and tell us the file's name.
The short version (for next time)
Restart → Recovery modes for BlissOS → BlissOS - Recovery Mode → Apply update → internal storage or usb → open the folder → your .zip → Enter → Down arrow to Yes → Enter → wait for status 0 → Reboot system now.